One of a Kind DIY Wall Art

I just made this gorgeous one of a kind wall art from air dry clay and I could not possibly be more pleased with myself! I don’t know what it says about my character, but for me the season’s must-have are always my least desired. So making something unique to hang on my wall is pretty exciting for me.

It all started from my efforts to make clay succulents.

Like this one I ruined with paint. Is it flower or succulent? You decide.

Materials:

  • Air Dry Clay in Terracotta. I used Sculpey’s Polyform Model Air, a 2.2lb brick of it was $17.99 at Michaels in Canada.
  • Foil – to make drying forms.
  • Rolling Pin
  • Crochet hooks or sculpting tools.
  • Leaf or Petal shaped cutters.
  • A frame – mine was from a second-hand shop, at $6.99 a bit more expensive than usual but it had that MCM flair to it.
  • Heavy cardboard or similar
  • Permanent glue such as crazy glue or glue gun.

How I made it:

From trial and error, I figured out that a foil ring was the perfect way to support my clay petals/leaves while they dried. Without it, they sag until they’re flat again.

I cut all of my petals with the wider cutter. I just trimmed them shorter as I got closer to the center of the flower.

After cutting out the petals, I flip them and use a moistened crochet hook to smooth away the crumbly parts the cutter leaves behind and to add texture. It’s easiest to smooth and texture a few at a time, they need to dry a bit before handling them because the water makes them slimy.

Starting at the outside of my clay dot, I add the petals one layer at a time. Pinching the tip of them gives some shape.

Once it’s done, I pop it in the oven at 170 to dry.

Painting the flowers:

After the clay succulent, I learned my lesson. Once you paint air dry clay, you can’t take it back.

So I made some test pieces to try different colors before committing to another mistake. The slab was a piece I rolled out but couldn’t use – an untended table does not remain cat hair free.

The chalks give a nice soft all over color on the slab, but did not work very well on the shaped pieces. The leaf dry-brushed white with a magenta tip is interesting but the finished flowers have so many spots that can’t be reached with a brush, I decided to just dry brush white on my flowers. I used the light turquoise color to paint the boards I glued the flowers to.

I intentionally made the flowers a little larger than the frame opening, so I put the boards in first, then glued the flowers in place.

One of a kind DIY wall art

I’m impressed at how well this wall art turned out.

If you enjoyed this post, don’t forget to share it with your friends! For more just like it, follow me on Pinterest, Facebook and Twitter or sign up for regular updates by email.

If you have ever thought about starting a garden or craft blog of your own see how easy it is >>here<<.

Save

Save

Save

Save

Save

Save

Save

Save

Save

Save

Terracotta Faux Succulent

I’ve been obsessed with the idea of making faux succulents lately, and it has been the most frustrating project I’ve ever tried.

There are a few tutorials out there for making succulents with felt, paper, pinecones (I love those) and even one with duct tape, but nothing for clay. But there are a lot of tutorials for making roses using cold porcelain clay.

Thinking I could use the rose technique, I made not just one, but three failed batches of home-made cold porcelain clay. The first batch was too dry, the second batch was to lumpy and the third batch was too sticky. Feeling like Goldilocks and the three bears, I tossed it all and went to Michael’s. That tells you how obsessed I was with making faux succulents, because I despise shopping.

Once I got home, I realized I grabbed the terracotta color instead of white. Now understand that I live with 2 dogs and a very insistent cat. It is a sad fact of my life that any time I’m elbow deep in a task, one of them will want to go out, or come in, or be fed, or whatever, and I had failed at this project for three days in a row. Three days of very sticky, messy discouraging failure. Three days of having my hands covered in sticky goo while the cat hung from my window screens to come in.

I was so frustrated I went to bed to watch YouTube videos, and found this one.

At least I had an idea of how to get started now.

Faux Succulent Materials:

Please note, some of the links below are affiliate links. Should you make a purchase through one of these links, you still pay exactly the same price but I make a small commission on the sale.

  • Package of air dry clay – I used Sculpey’s Polyform Model Air (in terracotta)
  • Leaf shaped cutters in two sizes – you can buy a kit for fondant that has multiple leaf shapes, or make them like in the video. There are a good selection to choose from >>here<<
  • Tools for sculpting – I used knitting and crochet needles but there are kits available.
  • Wax paper or plastic wrap
  • rolling-pin
  • a small bowl of water

Making the Faux Succulent

Faux Succulent Leaf Cutters

I made my leaf cutters from an old circle cutter. One is narrower than the other, to get different lengths just trim the cut leaves. My table is very old and stains easily, so I rolled out my clay on waxed paper and cut out a bunch of the larger leaves. I covered the clay I wasn’t using with waxed paper, and anytime I left my project I covered it as well.

Smoothing the faux succulent leaves

I flipped all the cut leaves to the bottom side and used a moistened crochet hook to smooth away the crumbly edges the cutters left.

faux succulent leaves adding texture

I started out using the moistened crochet hook to ‘shape’ the leaves, trying to give them a scooped out look, but I liked this textured effect instead. Water makes the clay slimy and hard to handle. I found it easiest to prepare a bunch of leaves and wait for the slime to disappear before trying to shape and attach them.

You can see the first two layers in place. I used pieces of drinking straw and clay to keep the curves shaped into the leaves. Otherwise the weight of the clay made them sag and flatten out.

I continued adding layers, pinching the tips of the leaves to cup them.

Here it is, finished and ready to dry. After nearly an entire week of failure, I wanted it done so I dried it in the oven set at its lowest temperature – 170.

And there it is, dried.

Paint it or leave it:

After so many fails at this project already, I should have left my faux succulent bare. Instead I tried painting it. Big mistake!

I attempted the Blue Mountain Pottery look but it didn’t work. I wish I had just lightly dry brushed the light turquoise color on the bare clay instead. Next time, I’ll know better!

If you enjoyed this post, don’t forget to share it with your friends! For more just like it, follow me on Pinterest, Facebook and Twitter or sign up for regular updates by email.

If you have ever thought about starting a garden or craft blog of your own see how easy it is >>here<<.

Save

Save

Save

Save

Save

Save

Save

Save

Floral End Table

Upcycled TV Stand and Tray Before

Remember that icky melamine folding table I had from the same place my TV Stand turned Tea Table came from? Well I had a lot of fun making and floral end table from that 80’s melamine. Or at least I did after I recovered from a couple of big mess-ups!

I started out by scrubbing the table down and then I spray-painted it in Rustoleum’s ‘Aqua’. Once everything seemed dry enough I moved to the next step. I knew after recently seeing some Merimekko textiles and wall-coverings that I wanted to have big billowy flowers, and that I wanted to use strong colors.

Marimekko Inspired Floral

I added the centers and painted in some little white flowers in the bare spots. It looked awesome. The next morning I took my floral end table outside to spray sealer on it and watch completely horrified as the Aqua spray paint started to lift and crackle. Seriously it was like watching a stone chip in a windshield turn into a crack across the whole thing.

Honestly even though I knew it wasn’t a good finish, I was going to leave it as it was. So then I went to add the second coat of sealer, and grabbed the wrong can.

Crackling Paint on first floral end table

Still I soldiered on and turned it into an ‘airbrushed’ edge, and really I was going to just use it as it was. Right up until a bird came along and shit right in the middle of the table. That’s when I grabbed the palm sander and sanded everything off, giving the melamine a good scuff in the process.

Better the second time around?

Outlining Flowers

Once the base color was dry, I started painting my big billowy flowers again. I’ve doodled flowers like anybody else, but I found it surprisingly hard to make really big flowers. For each one I painted an outline first.

Filling In

Then I used a larger brush to fill them in. The paint I used really showed the brush strokes. Rather than stress about it, I incorporated the texture.

Flower Texture Detail

After the first layer was fully dry, I added centers to the flowers.

Stippling centers

I sort of stippled them for the texture it added to the paint.

Outlining White Daisy Petals

I added some white daisies to lighten up the dark blue flowers.

Daisies Finished

I left it to dry some more.

Stippling Centers of Daisies

I stippled the centers of these too, just with a smaller brush. Once it was completely dry, I took it outside to seal it. I sent a quick prayer to the spray paint gods before starting and then gave it a good coat. Everything was fine this time. I think the first event was just from forgetting to scuff up the melamine before I painted it.


Floral End Table

So there it is, an end table for my deck made from an old melamine folding table. I think I’m going to have to decide which style direction the deck furnishings are going in soon though. Because the Tea Table and the End Table aren’t exactly coordinating or even complimentary styles or colors.

Upcycled Side Table Up Close (1)

So what do you think – are the daisies overkill?

If you enjoyed this post, don’t forget to share it with your friends! For more just like it follow me on Pinterest, Facebook and Twitter or sign up for regular updates by email.

If you have ever thought about starting a garden or craft blog of your own see how easy it is >>here<<.


Save

Save

Save

Save

Save

Save

Save

Upcycled TV Stand Into Tea Table

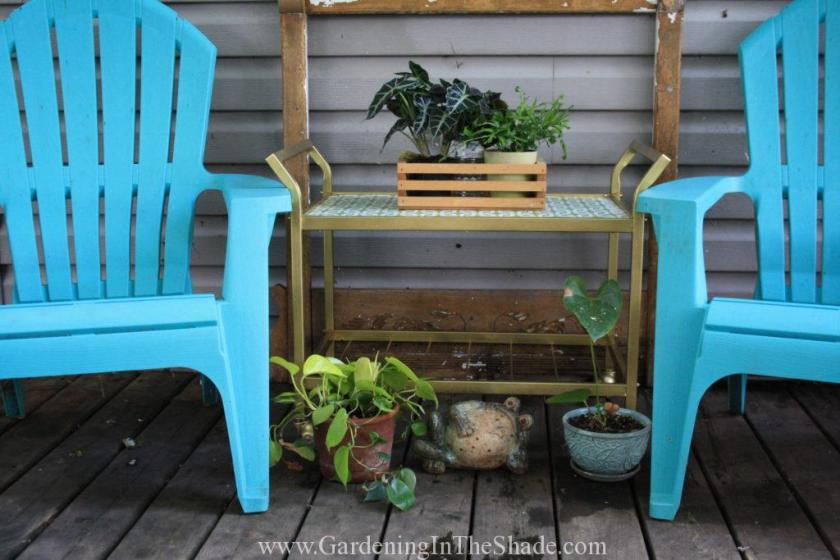
My current deck furniture situation is okay when it’s just me sitting out there, but there is a shortage of surfaces capable of holding a drink. A situation that gets awkward quickly when I sit out there with my friends. So Saturday I made a trip to Picker’s Pig Pen to see if I could find anything that would work. Well wait until you see how great this TV stand looks after I got done with it.

I found this great old rusty TV cart on Saturday and a melamine TV Tray
I found this great old rusty TV cart on Saturday and a melamine TV Tray. My oldest boy gave them his ‘that’s disgusting’ lip curl.

This is what I started with, an old TV cart that was probably from the 70’s. I always have a hard time picking the right decade, because we kept stuff forever in my family. It had the walnut colored fake wood grain mactac, and the shelves were masonite imitating walnut. But as rusty as it was, it was solid, more solid than any thing I’ve bought new lately.

So I grabbed a bucket of hot water and Mr. Clean and scoured away as much of the rust as I could. Then I spray-painted the metal – fake wood-grain stickers and all – with antique gold spray paint. I am pretty hit and miss when it comes to my spray painting skills, but this time I nailed it. Honestly I kept staring at that frame all night.

But I still had to do something about the ‘walnut’ shelves. One was too warped to use, but I spray-painted the other one in a color to match my plastic Adirondack chairs – Rustoleum ‘Aqua’.

It did not look good with the gold-colored frame at all!

I had seen an article where someone decoupaged a table top and it looked awesome. So I dug through my fabric stash, and tried Mod Podge for the first time in my life. Because it was my first time using it, there are no step by step pictures for this one. I had a hard time just keeping up with how quickly the Mod Podge was drying in the heat, but the link above will take you to some pretty clear instructions. I sprayed it with a Matte finish sealer once it was dry so we will see how well it holds up to the weather.

Check out my new Tea Table!

Upcycled TV Cart

There’s plenty of room for a tray of tea things now, even with my plants on there!

Upcycled TV Stand, Bottom Shelf

A bottom shelf for tucking away anything I’ve piled beside my chair when company comes.

Upcycled TV Stand Front

I really need to decide if I’m going to keep the mirror frame on the deck. It looked fabulous when it still had chippy white paint on it, but all the chippy paint has chipped away to nothing.

Upcycled TV Stand, old fake wood stickers

You can still see the fake wood grain if you look closely.

Upcycled TV Stand

I just love this happy bright apple-green fabric.

The melamine TV tray from the 90’s in the first picture is coming up this week, and trust me it was a DIY that started out so flipping awesome until everything, and I mean everything including random bird poop, started to go wrong.

If you enjoyed this post, don’t forget to share it with your friends! For more just like it follow me on Pinterest, Facebook and Twitter or sign up for regular updates by email.

If you have ever thought about starting a garden or craft blog of your own see how easy it is >>here<<.


Save

Save

Save

Save

Save

Save

Save

Save

Save

Save